Equipment
The standard disclaimers about how dangerous climbing is and how unreliable anything is you read anywhere apply here as well. This site is far from definitive (and probably far from accurate). It is here for the amusement of myself and friends and possibly to shed some light, though I don't mind a little obfuscation now and again either. Various parts have been adapted and pilfered from sources found hither and yon, though I have tried to make all entries mostly original. So please read, but remember that responsibility for safe climbing is your own.
1. The Basics: Harness, Boots and belay device
These three bits of kit are what you need to climb at an indoor wall, or outside if you have a helpful friend with kit. They are worth looking at in detail.
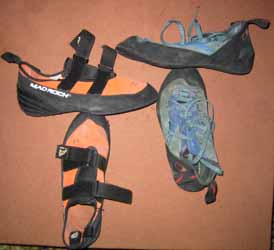
a) Harness
A basic sit-harness looks like the picture below. It consists of leg loops and a waistband, connected by means of a loop (known as the belay loop). It also contains gear loops, to hang kit on.
[Picture TBA]
The important thing to remember is that the safe point of attachment is the belay loop and the straps that hold it to the waistband and leg loops. Nowhere else. The gear loops are NOT rated to any significant force, so if you tie in via a gear loop, and fall, they will rip off. Equally, if you belay from a gear loop, and the climber falls, they will rip off, and, presuming they survive the fall, they will tear the belayers head off. I would.
Cost? £40-60
b) Boots
The days of climbing in hob-nailed boots is long gone (in theory, I've seen it at crags some old geezer clambering up a route in boots and flat cap. This looked quaint until I realised he was actually doing something really hard as if it was a flight of stairs. Beware frail old men!). These days people use boots that approximate to rubber covered foot gloves.
Again, pictures below.
The important thing to mention here. They are really, really uncomfortable. If you can walk in them without pain they are probably too loose.
Cost? £40-60
c) Belay device
There's lots and lots on the market. Most people use a variety on the ATC or Bug (photo below). Most of them can also be used as an abseil device. Generally they cost about £10-15 with a screwgate krab.
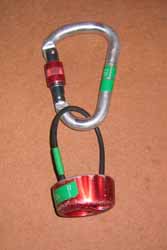
However, one worth mentioning is the gri-gri. This is an automatic locking belay device, so if the climber falls it instantly locks off. These are heavy and expensive (£30) but much used on the continent and by groups under instruction.
The issue with belay devices is this;
The faster the belay device locks off the faster the climber is brought to a halt and the less of the force of the fall is absorbed by the belay device and more of the force of the fall is absorbed by other parts of the system i.e. the climber, the rope and the protection.
With a gri-gri s instant lock off you are shock loading the rest of the system. If you are on new bolts on the continent, that s fine, but if you are on dodgy gear then the last thing you want is to shock load it. The ATC-type is a reasonable compromise, but when really dodgy gear is being used (eg. Ice screws) you really want the maximum force to be absorbed by anything else than the gear, even if the climber falls a bit further. Hence for ice climbing many people use a figure-of-eight decender as a belay device this has the maximum slippage of any commonly used belay device, but there have been some really impressive accidents, as its ability to hold a falling climber and lock off quickly is much less than other forms of belay device.
Belaying is an art, not a science, and although the equipment is cheap, experience is the best way to learn to use them.
2. The next bits. Rope and quickdraws.
a) Rope
Ok, this might get confusing.
A single rope is a rope which has been rated for use ON ITS OWN. A double rope is a rope which has been rated for use WITH ANOTHER ROPE OF DOUBLE OR GREATER rating. i.e. a double rope is less strong than a single rope.
Ropes are rated for the following
1. Length. 30m, 40m (wall ropes not really long enough for many routes outside). 50m (normal) 60m (long), 70m (some routes need these).
2. Dry treatment Normal, Dry or Superdry. Basically the degree to which they turn into a sponge when dropped in that puddle. Also, if you are using a normal rope, and it starts to rain, it absorbs a lot of water, and gets very heavy. You can also get ropes for caving that are designed to not only be entirely waterproof, but also float. You pay for them, though.
3. Falls The number of standard falls they can take before breaking.
4. Sharp edge treatment Whether they pass the sharp edge test a Standard fall over a standard sharp edge without cutting.
In addition there are varying thicknesses. At the time of writing, the thinnest single rope on the market is 9mm, and they vary up to about 11mm. The trade-off here is between weight and working life. A thin rope may be light to trail behind you up a route, but it will wear out more quickly.
Double ropes are designed to be used with another using double rope technique (each climber uses two ropes). Hence they can be thinner.
For use at a wall or on bolted routes a single rope is required. Expect to pay £50 for an ultra-budget 50m to £150 for a Superdry 70m with high fall factor and sharp edge tested.
Double ropes are a bit cheaper. Say £50-£120.
NOTE the static strength of a climbing rope is HUGE. Most climbing ropes will happily hold a couple of cars hung off them. Your paltry 20 stone falling on a rope will not break it.
Also note, ropes are designed to stretch, in order that a climber is brought to a halt gently, and again so the other parts of the system are not overloaded. Climbing ropes are therefore described as dynamic ropes, and may stretch by up to 40%.
b) Quickdraws
Two karabiners (krabs) connected by a short sling. Photo below. (matchbox to show scale)
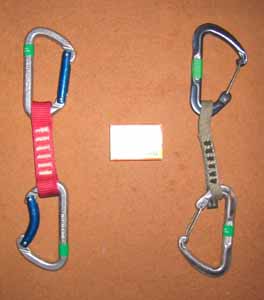
Basically, the trade-off here is between weight and price. The more you pay, the less they weigh. There's also all sorts of "fits the hand better" "quicker clipping" stuff boasted, which may be true, but weight is the main factor. You may think that small differences may not mean much, but multiply by 20 and haul them 300ft up a cliff and small differences can get quite a bit bigger.
Bargain basement stuff is about £5 per quickdraw (left in photo above). Top of the pile is about £15 each (right in photo above). You will eventually need at least one set of eight.
Note Always keep one end for the bolt/gear and one end for the rope. If you take a fall then the bolt can put small nicks in the quickdraw, which, if that end is then used for the rope, can put small nicks in the rope.
3. Very useful Screwgates and slings.
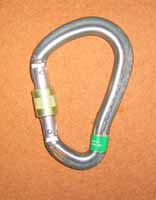
a) Screwgates
Basically a krab where the gate screws shut. Very useful for times when it is really, really essential that the gate stays shut. Setting up belays, anchors, top-ropes, etc. A few of these are very useful to have. Minimum £5 maximum £15.
b) Slings
Basically a loop of tape, rated at some silly breaking strength (a couple of tons). Useful for hanging gear onto, setting up belays, anchors, etc. Also for looping through holes in the rock and using as protection. Cost about £1 for a small one (30 cm long) to £15 for something huge (say 4m long)
4. Trad climbing essentials 1 Passive protection
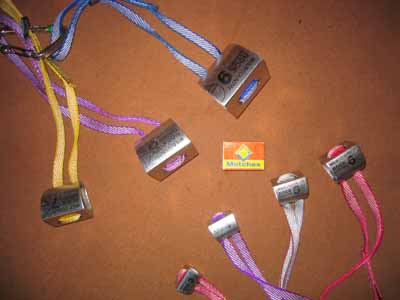
a) Nuts
Basically tapered lumps of metal on wire that are jammed in a crack. The name comes from their original form which was engineering nuts on a bit of wire. The shape has evolved since then, to the form shown in the photo below.
The degree to which one would trust these bits of metal varies with size and placement. The big ones will happily hold a big fall, the small ones **might** slow you down a bit as they either rip out of the placement or simply rip apart. Most climbers I know have rarely placed micro-nuts (or microwires) and never trusted them. Of psychological help only!
Cost? A set of sizes 1-10 should be gettable for £50-ish. The picture shows two sets, 1-10(right - silver) and 1-14(left - coloured), plus microwires (6 o'clock on photo).

The size of some of the microwires does not inspire faith..(the one on the right about a quarter of the size of the pencil rubber is a microwire - the other two are normal nuts)
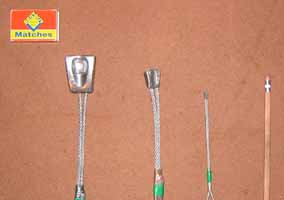
In fact, there is a T-shirt on the market with a similar selection of sizes in a similar photo as above.
It is captioned "Faith, Hope and Charity"
b) Hexes
Basically bigger bits of metal. Again, the shape has evolved over the years, but the principle remains the same. Jam it in a crack, give it a few tugs, if it looks like its going to stay put, clip it into one end of a quickdraw and the rope into the other.
As they are much bigger, they are much more trustworthy.
A set of sized 3-9 should be gettable for £60
5. Trad climbing essentials 2 Active protection
a) Camming devices (Cams)
A fairly recent invention The idea is that pulling on the trigger retracts the cams, and the cam is then placed into a crack. When the trigger is released the arms expand and grip the size of the crack. If a sudden load comes onto the cam, the force on the stem will make the arms try and expand more i.e. just grip the crack more tightly.
Photo 1&2: a size 4.5 camalot shown fully extended and about 2/3 cammed down.

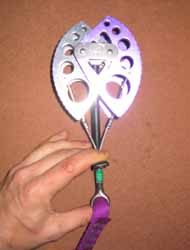
Photo 3: Selection of sizes (Camalot 4.5 on left)
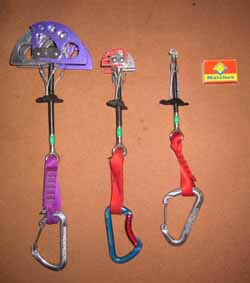
These also come in vastly different sizes, though in the picture above the largest cam shown is **almost** the largest on the market and the smallest is **almost** the smallest.
They also come in varying types, from different manufacturers. Cost is from about £25 EACH for the cheapest to about £60 EACH for the most expensive. You can get by without them, but they are useful. How many and what size is up to your budget.
Note As the originals were called Friends , this name is often used for any camming device, even though it should really only be used for products from Wild Country.